Embarking on an RV journey is an extraordinary adventure that allows you to explore new horizons, connect with nature, and immerse yourself in captivating landscapes. Amidst this exciting journey, photography becomes the perfect companion, enabling you to capture the beauty and essence of your RV travel experiences.
In this comprehensive guide, we delve into the world of RV travel photography and provide you with a wealth of tips, techniques, and insights to enhance your skills and elevate your photography to new heights. Whether you’re a seasoned photographer or just starting your photographic journey, this article will equip you with the knowledge and inspiration to make the most of your RV travel photography.
We begin by exploring the importance of planning your photography route, allowing you to identify key locations and photographic opportunities along your journey. By strategically planning your itinerary, you can ensure that you don’t miss out on capturing the most remarkable sights and experiences.
Next, we delve into the essential gear you should pack for your RV travels. From cameras and lenses to tripods and filters, we discuss the tools that will enable you to capture stunning images during your adventures. Additionally, we provide insights on how to protect and maximize limited space in your RV for your photography equipment.
Lighting is a crucial element in photography, and we dedicate a section to embracing natural light. Discover how to harness the magic of golden hour and make the most of different lighting conditions to capture breathtaking images that showcase the true beauty of your surroundings.
To truly capture the essence of your RV travel experiences, we guide you through the art of composition. Learn how to frame your shots, utilize leading lines, and create visual balance to convey the sense of place and evoke emotions in your viewers.
Photographing wildlife is often a highlight of RV travel, and we delve into techniques for capturing stunning wildlife images ethically and responsibly. Discover how to respect wildlife habitats, maintain a safe distance, and capture the beauty of nature without causing harm or disturbance.
Incorporating the RV lifestyle into your photography adds a personal touch to your images. We explore how to document the unique moments, connections, and details of your RV journey, allowing your photographs to tell a compelling visual story that reflects your own experiences and memories.
Post-processing and sharing your images play a vital role in showcasing your photography. We provide insights into editing techniques and software, enabling you to enhance your images and bring out their full potential. Additionally, we explore various platforms and methods for sharing your RV travel photographs, connecting with others, and inspiring fellow travelers.
Finally, we address common challenges that arise during RV travel photography and provide practical solutions. From limited time at each location to unpredictable weather conditions, we offer tips and advice on overcoming obstacles to ensure you capture stunning images throughout your journey.
So, whether you’re a photography enthusiast looking to improve your skills or an RV traveler eager to document your adventures, this comprehensive guide is your gateway to mastering the art of RV travel photography. Let your creativity soar, embrace the beauty of the world around you, and capture moments that will forever preserve the magic of your RV travels.
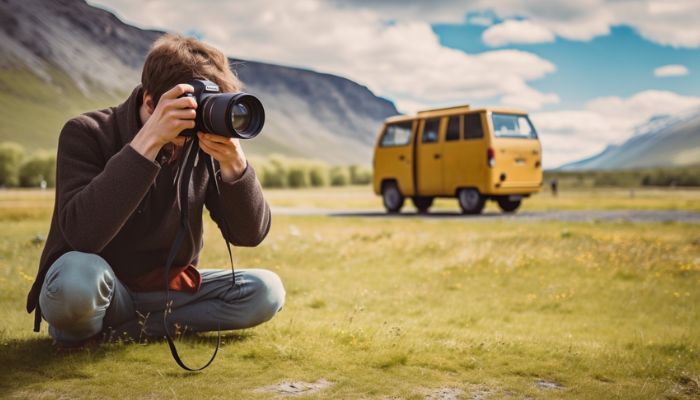
Table of Contents
- 1 Plan Your Photography Route
- 2 Pack the Essential Gear
- 3 Embrace Natural Light
- 4 Capture the Essence of Your Surroundings
- 5 Incorporate RV Lifestyle
- 6 Post-Processing and Sharing
- 7 Mastering Composition Techniques
- 8 Creative Photography Projects
- 9 Night Sky Photography
- 10 Photographing Wildlife
- 11 Creating Travel Photo Stories
- 12 Mobile Photography Tips
- 13 Overcoming Challenges of RV Travel Photography
- 14 Ethics and Responsible Photography
- 15 Frequently Asked Questions
- 16 Final Thoughts
Plan Your Photography Route
Research and Explore: Start by conducting thorough research about the destinations along your RV route. Look for places known for their scenic beauty, unique landscapes, iconic landmarks, or cultural significance. Explore travel guides, photography blogs, and online forums to gather information and inspiration. Seek recommendations from fellow photographers who have visited the areas you plan to explore.
Check Weather and Lighting Conditions: While planning your photography route, take into account the weather conditions and how they can impact the lighting. Certain landscapes may look completely different under different weather conditions. Cloudy days, for example, can create moody and dramatic scenes, while clear skies are ideal for capturing vibrant landscapes. Check weather forecasts and plan your visits accordingly to maximize your chances of capturing the desired lighting conditions.
Plan for Sunrise and Sunset: Sunrise and sunset are magical times for photography, often referred to as the golden hours. The soft, warm light during these periods can transform a scene and add depth and beauty to your images. Research the exact sunrise and sunset times for your destinations and plan to be in the right location at the right time. Be prepared to wake up early or stay out late to capture the stunning colors and the interplay of light and shadow.
Seek Local Guidance: When planning your photography route, consider reaching out to local photographers or photography groups in the areas you plan to visit. They can provide valuable insights into lesser-known spots, hidden gems, and seasonal attractions that are worth photographing. Local knowledge can help you discover unique perspectives and opportunities that may not be readily available in popular travel guides. Engaging with locals can also foster connections and create opportunities for collaborative photography ventures.
Create a Shot List: Once you have a rough idea of the destinations you’ll be visiting, create a shot list. Identify specific landmarks, natural features, or scenes you want to capture at each location. This will help you stay organized and focused on your photography goals, ensuring you don’t miss any key shots. Consider researching popular viewpoints, trails, or vantage points to capture the best angles and compositions. However, don’t limit yourself to the shot list entirely. Be open to serendipitous discoveries and spontaneous moments that can add a touch of magic to your photography.
Time Management: Plan your itinerary in a way that allows you to spend enough time at each location. Rushing from one spot to another may leave you feeling stressed and limit your ability to fully explore and photograph the area. Allocate ample time for scouting locations, waiting for the ideal light, and setting up your shots. Remember, quality photography requires patience and allowing yourself to immerse in the surroundings.
Backup Locations and Flexibility: Despite careful planning, unforeseen circumstances such as road closures, weather changes, or unexpected crowds can disrupt your photography plans. Prepare backup locations or alternative routes to ensure you have options if your primary destinations are inaccessible or overcrowded. Flexibility is key to adapting to changing conditions and making the most of any photography opportunities that come your way.
By planning your photography route thoroughly, you’ll be well-prepared to capture stunning images throughout your RV journey. Researching destinations, considering weather and lighting conditions, seeking local guidance, creating a shot list, managing time effectively, and staying flexible will all contribute to a successful and rewarding photography experience.
Pack the Essential Gear
Camera: Investing in a quality camera is essential for capturing stunning photographs. Choose a camera that suits your needs and skill level. Consider options such as DSLR cameras, mirrorless cameras, or advanced smartphones with exceptional camera capabilities. Select a camera that offers good image quality, manual controls, and the ability to interchange lenses if you plan to use different lenses for various photography situations.
Lenses: Carry a range of lenses to cover different focal lengths and photographic styles. Here are a few lens options to consider:
- Wide-Angle Lens: Ideal for capturing expansive landscapes, wide-angle lenses create a sense of depth and allow you to include more of the scene in the frame.
- Standard Zoom Lens: A versatile lens that covers a moderate focal length range, typically around 24-70mm, is great for general photography, portraits, and everyday situations.
- Telephoto Lens: A telephoto lens with a longer focal length, such as 70-200mm or longer, is useful for capturing distant subjects, wildlife, or compressing the perspective in landscape shots.
- Macro Lens: If you’re interested in close-up and detailed photography of flowers, insects, or small objects, consider a macro lens to capture intricate details.
Choose lenses based on your preferred photography genres and the subjects you expect to encounter during your RV travels.
Tripod: A sturdy tripod is a must-have accessory for landscape, long-exposure, and low-light photography. It provides stability and allows for longer exposure times, reducing the risk of camera shake. Look for a lightweight and durable tripod that can handle the weight of your camera and lens combination. Consider features such as adjustable height, stability in windy conditions, and compatibility with different camera systems.
Filters: Filters can significantly enhance your photography by controlling light, reducing glare, and creating specific effects. Here are two essential filters to consider:
- Polarizing Filter: A polarizing filter helps reduce reflections and glare from surfaces such as water or glass, intensifies colors, and enhances contrast. It is particularly useful for landscape photography and capturing vibrant skies.
- Neutral Density (ND) Filter: ND filters reduce the amount of light entering the camera, allowing you to use longer shutter speeds or wider apertures even in bright conditions. They are ideal for creating motion blur effects in waterfalls, rivers, or clouds, and for balancing exposure in high-contrast scenes.
Ensure that the filters you choose are compatible with your lens diameters and invest in high-quality filters to maintain image quality.
Extra Batteries and Memory Cards: Always carry spare batteries and memory cards to avoid running out of power or storage space. RV travel often takes you to remote locations where charging opportunities may be limited. It’s advisable to carry at least one extra battery for your camera and multiple memory cards with sufficient storage capacity. Remember to format your memory cards before each use to ensure smooth operation.
Camera Bag or Backpack: A reliable camera bag or backpack is essential for safely storing and transporting your photography gear. Look for a bag with padded compartments to protect your camera and lenses from bumps and scratches. Consider the size and weight of your gear when choosing a bag, ensuring it can comfortably accommodate your equipment without being too cumbersome to carry.
Cleaning Kit: Keep your gear clean and dust-free with a camera cleaning kit. Include a blower or brush to remove dust particles from the lens and camera body, microfiber cloths for gentle cleaning, and lens cleaning solution for smudges or fingerprints. Maintaining clean equipment will help ensure the quality of your photographs.
By packing the essential gear mentioned above, you’ll be well-equipped to capture stunning images during your RV travels. Choose equipment that suits your photography style, invest in high-quality gear, and always prioritize the protection and maintenance of your equipment.
Embrace Natural Light
Understand the Golden Hours: The golden hours refer to the period shortly after sunrise and before sunset when the light is soft, warm, and diffused. During these times, the sun is positioned at a low angle, creating long shadows, rich colors, and a magical atmosphere. Make it a priority to shoot during these hours to capture stunning landscapes and enhance the mood of your images.
Pay Attention to Direction and Quality of Light: Observe the direction and quality of light to create captivating photographs. Front lighting, where the light source is behind you, illuminates the scene evenly and is ideal for capturing details and colors. Side lighting, where the light comes from the side, creates depth, texture, and emphasizes shapes and contours. Backlighting, where the light source is behind the subject, can create silhouettes or add a halo effect. Experiment with different lighting directions to evoke different moods and capture unique compositions.
Diffuse Harsh Light: When shooting under direct sunlight, particularly during midday when the light is harsh, it can create strong shadows and high contrast. To mitigate these effects, look for ways to diffuse the light. Utilize natural elements like trees, foliage, or architectural structures to cast shadows or create interesting patterns. Additionally, you can use diffusers or reflectors to soften the light or fill in shadows on your subjects.
Experiment with Backlit Scenes: Backlighting can add a touch of magic and drama to your images. It occurs when the main light source is behind your subject, creating a halo effect or highlighting the edges. When shooting backlit scenes, be mindful of your exposure settings. To avoid underexposing your subject, use exposure compensation to adjust the exposure value and maintain details in both the subject and the background. Embrace lens flare as an artistic element by positioning the sun partially or entirely within the frame.
Capture the Golden Hour Glow: During the golden hours, the warm and soft light can cast a beautiful glow on your subjects. This light is particularly flattering for portraits and can create a sense of warmth and tranquility in landscapes. Experiment with different compositions, angles, and focal lengths to make the most of this magical light. Include elements such as water, foliage, or architecture to reflect and enhance the warm hues of the golden hour.
Explore Low-Light Photography Techniques: As the day transitions from daylight to twilight, unique opportunities arise for low-light photography. Experiment with long exposures to capture the movement of clouds, stars, or flowing water. Utilize a tripod to maintain stability during longer shutter speeds. Additionally, consider photographing cityscapes or campfire scenes during the blue hour, which occurs before sunrise and after sunset when the sky takes on a deep blue hue.
Embrace Weather and Atmospheric Conditions: Don’t let unfavorable weather conditions deter you from capturing remarkable images. Stormy skies, fog, rain, or snow can add drama, mood, and a sense of atmosphere to your photographs. Adapt your compositions and techniques to embrace the weather and make it an integral part of your storytelling. Ensure your gear is protected from the elements using appropriate rain covers or protective cases.
By embracing natural light and understanding how it interacts with your subjects, you’ll be able to create captivating and evocative photographs during your RV travels. Pay attention to the golden hours, experiment with different lighting directions, and be open to the beauty that diverse weather conditions can bring. Remember to adapt your exposure settings accordingly and let your creativity shine through.
Capture the Essence of Your Surroundings
Study the Location: Before you start capturing images, take the time to study and understand the location you’re in. Observe the unique features, natural elements, architectural details, and cultural aspects that define the place. Consider the history, local traditions, and significance of the area. This understanding will help you compose your shots and capture the essence of the surroundings more effectively.
Look for Unique Perspectives: Instead of settling for the typical tourist shots, challenge yourself to find unique perspectives that showcase the character of the location. Explore different angles, vantage points, and compositional techniques to add depth and interest to your images. Get closer to your subjects, experiment with different focal lengths, or even try shooting from ground level or elevated positions to provide a fresh and captivating viewpoint.
Highlight Landmarks and Points of Interest: If you’re in an area known for its landmarks or points of interest, make sure to capture them in a way that reflects their significance. Experiment with different compositions, framing techniques, and perspectives to present these landmarks in a new light. Consider including elements of the surroundings or incorporating people to add scale and context to your images.
Capture Local Culture and Lifestyle: One of the joys of RV travel is experiencing different cultures and lifestyles. Use your photography to document the local culture and the unique experiences you encounter. Capture candid moments of people going about their daily lives, engaging in cultural activities, or showcasing traditional crafts. These images will not only preserve memories but also provide insights into the spirit of the place.
Pay Attention to Details and Textures: To capture the essence of your surroundings, focus on the details and textures that make a location unique. Zoom in on architectural details, capture close-ups of local flora and fauna, or highlight the textures of natural elements like rocks, sand, or tree bark. These images can add depth and authenticity to your collection and evoke a sense of connection with the place.
Incorporate Elements of Nature: If you’re surrounded by breathtaking natural landscapes, make sure to capture the beauty of nature in your photographs. Emphasize the grandeur of mountains, the serenity of lakes, the power of waterfalls, or the tranquility of forests. Incorporate elements of nature as foreground or background elements to add context and create a stronger impact.
Document Seasonal Changes: If your RV travels take you through different seasons, take advantage of the changing landscapes and capture the beauty of each season. From vibrant autumn foliage to blooming flowers in spring, each season brings its own charm. Pay attention to the seasonal changes and adapt your compositions and techniques accordingly to showcase the unique atmosphere of each time of year.
Tell a Story: As you capture the essence of your surroundings, aim to tell a story through your photographs. Consider the narrative you want to convey and look for elements and scenes that contribute to that story. Think about the emotions, atmosphere, and unique moments you want to encapsulate in your images. Compose your shots intentionally to evoke a sense of place and transport viewers into the scene.
Remember, capturing the essence of your surroundings goes beyond simply taking pictures. It involves immersing yourself in the location, understanding its nuances, and using your photography skills to convey the spirit and character of the place. Embrace the unique aspects, seek out hidden details, and let your creativity guide you as you capture the essence of your RV travel adventures.
Incorporate RV Lifestyle
Documenting the Journey: While exploring the world in your RV, don’t forget to document the journey itself. Capture candid moments of life on the road, such as setting up camp, enjoying meals, or relaxing around the campfire. These images will serve as cherished memories, reflecting the unique lifestyle and sense of adventure that RV travel offers.
Interior Details: Highlight the cozy and personalized interiors of your RV. Photograph the well-designed living spaces, unique decorations, and thoughtful touches that make your RV feel like home. Focus on capturing the details, such as the arrangement of pillows, the warmth of the lighting, or the rustic charm of the kitchen. These images will not only preserve the memories of your RV, but they can also provide inspiration to other RV enthusiasts.
Outdoor Living Spaces: Make the most of the outdoor living spaces that come with RV travel. Whether it’s an awning, outdoor seating area, or a portable grill, these areas offer unique opportunities for capturing images of leisure, relaxation, and connection with nature. Photograph scenes of enjoying a cup of coffee outside, sharing meals with loved ones, or simply taking in the beautiful surroundings.
Campground Life: RV travel often involves staying at campgrounds and RV parks, which are vibrant hubs of community and camaraderie. Capture the social aspects of campground life, such as interactions between fellow RVers, group activities, or communal gatherings. These images will help showcase the sense of community that forms among travelers and emphasize the shared experiences of the RV lifestyle.
Scenic Campsites: While selecting campsites, seek out scenic locations that provide breathtaking backdrops for your photography. Capture your RV against stunning landscapes, picturesque sunsets, or serene lakes. Experiment with different compositions and lighting conditions to make your RV an integral part of the composition, while still showcasing the beauty of the surroundings.
Roadside Adventures: RV travel often involves spontaneous roadside stops and unexpected discoveries. Embrace these moments by documenting the unique roadside attractions, charming towns, or scenic viewpoints that you encounter along the way. These images can serve as a reminder of the serendipitous nature of RV travel and the joy of exploration.
People and Pets: Include the people and pets who share your RV adventures. Photograph the expressions of joy, wonder, and connection as you explore together. Capture the bonds between family members, friends, or the special relationships formed on the road. Including pets in your images can add an element of warmth and playfulness, reflecting the pet-friendly nature of RV travel.
Details of RV Life: Highlight the little details that make RV life special. Photograph the campfire cooking, the creative storage solutions, or the personalized decorations that reflect your personality and style. These images will add depth to your storytelling, providing a glimpse into the practical aspects and unique features of the RV lifestyle.
By incorporating the RV lifestyle into your travel photography, you’ll create a comprehensive visual narrative that not only showcases the places you visit but also reflects the spirit of adventure, community, and comfort that RV travel provides. Celebrate the unique aspects of RV life and capture the moments that make your journey truly unforgettable.
Post-Processing and Sharing
Organize and Select Your Images: Once you’ve captured a multitude of images during your RV travels, it’s important to organize and select the best ones for post-processing. Review your images and choose the shots that best represent your experiences and evoke the desired emotions. Delete any duplicates, blurry images, or shots that didn’t turn out as expected. This initial curation will help streamline your post-processing workflow.
Choose the Right Post-Processing Software: Select a post-processing software that suits your needs and skill level. Popular options include Adobe Lightroom, Capture One, and ON1 Photo RAW. These software tools offer a wide range of editing capabilities, allowing you to adjust exposure, color balance, contrast, and more. Familiarize yourself with the chosen software’s features and learn basic editing techniques to enhance your images effectively.
Enhance Exposure and Contrast: During post-processing, pay attention to the exposure and contrast of your images. Adjust the exposure to ensure proper brightness and detail in the highlights and shadows. Use contrast adjustments to enhance the visual impact and bring out the desired tonal range. Be careful not to overdo these adjustments, as it can lead to unnatural-looking images. Aim for a balanced and realistic representation of the scene.
Fine-Tune Colors and White Balance: Colors play a vital role in conveying the mood and atmosphere of your RV travel photographs. Adjust the white balance to ensure accurate color representation. If you prefer a specific color cast or want to emphasize certain tones, you can experiment with color grading techniques. Use saturation and vibrance adjustments to enhance or tone down the colors in your images, maintaining a natural and pleasing appearance.
Crop and Straighten: Consider cropping and straightening your images to improve composition and remove any distracting elements. Crop your photos to create a more balanced and visually appealing frame. Straighten horizons or architectural lines to ensure a level perspective. These simple adjustments can significantly enhance the overall impact of your photographs.
Sharpen and Reduce Noise: During the post-processing stage, apply sharpening techniques to enhance the clarity and detail of your images. Use tools like the sharpening mask or selective sharpening to ensure that the important elements are crisp and well-defined. Additionally, reduce noise in images taken in low-light conditions or at high ISO settings. Strike a balance between noise reduction and preserving image detail.
Maintain Authenticity: While post-processing can enhance your images, it’s essential to maintain the authenticity of the scene. Avoid excessive editing that distorts the reality of the moment. Strive for a natural look that accurately represents the emotions and experiences you encountered during your RV travels.
Share and Engage: Once you’ve post-processed your images, it’s time to share them with others. Utilize social media platforms, online photography communities, personal blogs, or websites to showcase your work. Engage with fellow photographers and RV enthusiasts, sharing your stories and experiences through your images. Participate in photography contests or submit your photographs to RV magazines or websites to reach a wider audience and gain recognition.
Remember, post-processing is a tool to enhance your images, but the true value lies in the moments you captured and the stories they tell. Use editing techniques judiciously to highlight the beauty of your RV travel experiences while preserving the authenticity of the scene. Enjoy the process of post-processing, sharing your work, and connecting with fellow photographers and enthusiasts who share your passion for RV travel photography.
Mastering Composition Techniques
Rule of Thirds: The rule of thirds is a fundamental composition technique that can instantly enhance the visual appeal of your photographs. Imagine dividing the frame into a grid of nine equal sections by two horizontal and two vertical lines. Position key elements of your composition along these lines or at their intersections. Placing the horizon on the upper or lower third line can create a sense of balance and interest.
Leading Lines: Utilize leading lines to guide the viewer’s eye through your photograph and create a sense of depth. Look for natural or man-made lines in your surroundings, such as roads, trails, fences, or rivers, and compose your shot to incorporate them. Leading lines can draw attention to a focal point, create a visual journey, or add a dynamic element to your images.
Framing: Framing is a powerful technique that adds depth and context to your photographs. Look for natural frames within your environment, such as arches, doorways, tree branches, or windows. Use these elements to enclose your subject and draw the viewer’s attention to the main focal point. Framing adds layers and visual interest, creating a more engaging and immersive composition.
Symmetry and Patterns: Symmetry and patterns can create visually striking compositions. Seek out symmetrical elements in your environment, such as reflections on calm waters, architectural designs, or rows of trees. Compose your shot to emphasize the symmetrical balance and capture the repetitive patterns. Symmetry and patterns evoke a sense of harmony and can result in captivating and balanced images.
Negative Space: Negative space refers to the empty areas around your subject. Utilizing negative space can create a sense of simplicity, minimalism, and focus on the main subject. Experiment with wide compositions that include a significant amount of negative space to emphasize the subject’s isolation, evoke emotions, or convey a sense of vastness.
Point of View: Explore different points of view to add creativity and uniqueness to your compositions. Instead of shooting at eye level, try crouching down low or finding an elevated position to change the perspective. Get close to your subject to capture intricate details, or step back to incorporate more of the surroundings. Changing your point of view can transform a mundane scene into something extraordinary.
Balancing Elements: Achieving a balanced composition is crucial to avoid a visually cluttered or lopsided image. Consider the placement and distribution of elements within your frame. Balance larger objects or subjects with smaller ones to create a sense of harmony. Pay attention to the visual weight and relationships between elements to ensure a well-composed photograph.
Breaking the Rules: While mastering composition techniques is essential, don’t be afraid to break the rules and experiment with unconventional compositions. Sometimes, deviating from traditional composition guidelines can lead to intriguing and thought-provoking images. Trust your instincts, embrace your creativity, and be open to exploring new and innovative ways to compose your photographs.
By mastering composition techniques such as the rule of thirds, leading lines, framing, symmetry, and more, you can elevate the visual impact of your RV travel photography. Remember, these techniques are not rigid rules but tools to guide your creative vision. Embrace experimentation and find your own unique style while capturing the beauty of your RV adventures.
Creative Photography Projects
Regional Cuisine: Embark on a culinary photography project during your RV travels by capturing the flavors and local dishes of each region you visit. Photograph vibrant farmers’ markets, capture the artistry of street food vendors, or document the process of cooking traditional recipes. Showcase the diversity and uniqueness of regional cuisine, highlighting the ingredients, preparation techniques, and cultural significance behind each dish.
Changing Seasons: Capture the beauty of the changing seasons in different locations through a photography project focused on seasonal landscapes. Document the vibrant colors of autumn foliage, the serenity of winter snowscapes, the blooming flowers of spring, and the lush greenery of summer. Visit the same locations during different seasons to showcase the dramatic transformations and the distinct atmosphere each season brings.
Roadside Americana: Embark on a project that explores the charm and nostalgia of roadside Americana. Photograph classic diners, vintage signs, retro motels, or old gas stations that dot the highways and byways. Embrace the unique character of these roadside icons, showcasing their distinctive aesthetics and the sense of nostalgia they evoke.
Faces of the Road: Capture the diverse and interesting faces you encounter during your RV travels. Engage with people along your journey and ask for their stories. Portray the human connections and unique characters through portraits that reflect the spirit of the places you visit. From fellow travelers to locals, these portraits can offer a glimpse into the lives and cultures that make your RV adventure memorable.
Hidden Gems: Seek out hidden gems and lesser-known attractions in each location you visit. Research off-the-beaten-path destinations, overlooked landmarks, or hidden natural wonders. Create a project that unveils the secret treasures of your RV travel destinations, capturing the beauty and intrigue of these less-explored places.
Reflections and Mirrors: Explore the creative possibilities of reflections and mirrors in your RV travel photography project. Look for reflective surfaces, such as lakes, puddles, glass windows, or shiny objects, and use them to create unique compositions. Experiment with symmetrical reflections, abstract patterns, and distorted perspectives to add intrigue and visual impact to your images.
Nightscapes: Embark on a project that focuses on capturing the mesmerizing nightscapes encountered during your RV travels. Explore the beauty of city skylines, stargazing in remote areas, or capturing the unique ambiance of campgrounds after dark. Experiment with long exposures, light painting techniques, and capturing the play of light and shadows in nocturnal scenes.
The Road Less Traveled: Document the roads and routes less traveled in a photography project that captures the sense of adventure and discovery. Explore scenic byways, remote country roads, or hidden trails. Capture the winding paths, captivating vistas, and the anticipation of the unknown that comes with exploring the road less traveled.
By embarking on creative photography projects during your RV travels, you’ll not only enhance your photography skills but also create a compelling visual narrative of your journey. These projects will add depth and diversity to your portfolio, showcasing the unique aspects of each location and the experiences that make your RV travel truly memorable. Embrace your creativity, challenge yourself to explore different themes, and let your photography tell stories that go beyond the traditional travel snapshots.
Night Sky Photography
Find Dark Sky Locations: To capture stunning night sky images during your RV travels, it’s important to find locations with minimal light pollution. Research and identify areas known for their dark skies, such as national parks, remote campgrounds, or designated Dark Sky Preserves. These locations offer optimal conditions for photographing the stars and other celestial objects.
Plan According to Moon Phases: Moonlight can significantly impact the visibility of stars and other night sky phenomena. Plan your night sky photography sessions around moon phases. New moon and crescent moon phases provide darker skies, allowing the stars and Milky Way to shine brighter. Consult a moon phase calendar to schedule your photography outings accordingly.
Use the Right Gear: Night sky photography requires specific equipment to capture the beauty of the stars. Here are some essential gear recommendations:
- Camera: Use a camera with manual controls that allow you to adjust settings like exposure time, aperture, and ISO.
- Wide-Angle Lens: Opt for a wide-angle lens with a low aperture (f/2.8 or lower) to capture a wider field of view and gather more light.
- Tripod: A sturdy tripod is essential for stable long-exposure shots and minimizing camera shake.
- Remote Shutter Release: Use a remote shutter release or cable release to avoid touching the camera and causing vibrations during long exposures.
- Flashlight: Bring a flashlight with a red filter to help you navigate and adjust camera settings without disrupting your night vision.
Master the Exposure Triangle: Understanding the exposure triangle—aperture, shutter speed, and ISO—is crucial for capturing night sky photographs. Use a wide aperture (low f/number) to gather more light. Experiment with longer shutter speeds (typically between 15 seconds to several minutes) to capture the movement of stars and create light trails. Adjust ISO to balance the exposure and minimize noise while maintaining image quality.
Focus on Infinity: Achieving sharp focus in night sky photography can be challenging. To ensure your stars are sharp and in focus, switch your lens to manual focus and set it to infinity (∞). Use the live view function on your camera to manually adjust the focus until the stars appear as small, pinpoint lights. You can also use the “infinity focus” mark on your lens as a starting point.
Capture Star Trails: To create captivating star trail images, use a longer exposure time, typically ranging from several minutes to hours. Select a composition with a strong foreground element to add interest to the image. Experiment with different exposure times and intervals between shots to capture the desired length and density of the star trails.
Include Foreground Elements: Incorporate interesting foreground elements to add depth and context to your night sky images. Look for natural elements, landmarks, or RVs that can serve as compelling subjects in the foreground. This helps create a sense of scale and adds visual interest to your composition.
Experiment with Light Painting: Light painting involves selectively illuminating certain areas of the scene during a long exposure. Use a flashlight or LED light to paint light onto the foreground elements or create unique light patterns in the image. This technique adds creativity and visual impact to your night sky photographs.
Post-Processing Night Sky Images: Post-processing plays a vital role in enhancing your night sky photographs. Adjust the white balance to achieve accurate color representation. Fine-tune exposure, contrast, and clarity to bring out the details of the stars and other celestial objects. Use noise reduction techniques to minimize noise that may appear in darker areas of the image. Experiment with selective adjustments to enhance specific elements of the composition.
Patience and Perseverance: Night sky photography requires patience and perseverance. Be prepared for longer exposure times, trial and error, and multiple attempts to achieve the desired results. Embrace the process, learn from each experience, and continue practicing to refine your skills and capture breathtaking night sky images.
By following these tips, you’ll be well-equipped to capture stunning night sky photographs during your RV travels. Remember, each night sky is unique, so embrace the opportunity to document the wonders of the cosmos and create images that inspire awe and appreciation for the beauty of the universe.
Photographing Wildlife
Research Wildlife Hotspots: Before embarking on your RV journey, conduct research to identify wildlife hotspots along your route. Look for national parks, wildlife refuges, or areas known for their rich biodiversity. These locations provide ample opportunities to encounter a variety of wildlife species and capture stunning photographs.
Practice Ethical Wildlife Photography: When photographing wildlife, it’s essential to prioritize the well-being and safety of the animals. Practice ethical wildlife photography by following these guidelines:
- Keep a safe distance: Maintain a respectful distance from the animals to avoid causing stress or disturbance.
- Use telephoto lenses: Utilize telephoto lenses to capture close-up shots without intruding on the animal’s personal space.
- Observe without interfering: Avoid altering the behavior of the animals for the sake of a photograph. Let them engage in their natural activities without disruption.
- Respect restricted areas: Follow park regulations and respect any designated areas or trails where wildlife photography may be restricted.
- Do not feed or bait: Refrain from feeding or baiting wildlife, as this can disrupt their natural behavior and create dependency on human presence.
Be Patient and Observant: Wildlife photography requires patience and keen observation. Take your time to study the behavior of the animals you encounter. Look for signs of activity, feeding patterns, or gathering spots. Stay alert and ready to capture spontaneous moments and unique interactions.
Capture Their Natural Environment: When photographing wildlife, aim to capture the animals within their natural environment. Consider the habitat they inhabit and incorporate elements such as trees, water bodies, or grasslands into your compositions. This approach provides context and enhances the storytelling aspect of your wildlife images.
Seek Golden Hour Opportunities: Take advantage of the golden hours—the hours around sunrise and sunset—for wildlife photography. The soft, warm light during these times adds a beautiful glow to your images and creates a pleasing atmosphere. Animals are often more active during these periods, increasing the chances of capturing dynamic and engaging shots.
Focus on the Eyes and Expression: The eyes are the windows to an animal’s soul. Ensure the eyes are sharp and in focus in your wildlife photographs. Aim to capture expressive moments that convey the animal’s emotions or unique characteristics. Patience is key to waiting for the right moment when the animal makes eye contact or exhibits an interesting expression.
Use Fast Shutter Speeds: Wildlife can be quick and unpredictable. To freeze their motion and capture sharp images, use fast shutter speeds. Adjust your camera settings accordingly, considering the speed and behavior of the animals you’re photographing. High shutter speeds will help you capture action shots, such as animals in motion or birds in flight.
Experiment with Depth of Field: Explore the creative possibilities of depth of field in wildlife photography. Use a wide aperture (low f-number) to create a shallow depth of field, isolating the animal from the background and drawing attention to the subject. Alternatively, for environmental portraits, consider using a narrower aperture to ensure the entire scene, including the habitat, is in focus.
Be Prepared for Unexpected Encounters: Nature can be full of surprises. Always be ready with your camera and settings for unexpected wildlife encounters. Keep your camera easily accessible and be prepared to capture spontaneous moments. Have a telephoto lens attached and ensure your settings are optimized for quick adjustments.
Respect and Learn About the Wildlife: Take the time to learn about the wildlife species you encounter. Understand their behaviors, habitats, and conservation status. This knowledge not only enhances your photography but also fosters a deeper appreciation and respect for the animals and their natural environment.
By following these tips, you can capture stunning wildlife photographs while practicing ethical and responsible wildlife photography. Remember, the well-being of the animals should always come first. Enjoy the thrill of wildlife encounters during your RV travels and create images that inspire appreciation for the natural world.
Creating Travel Photo Stories
Choose a Theme or Narrative: Creating a travel photo story involves selecting a theme or narrative that ties your images together. Consider the overarching story you want to tell. It could be the exploration of a specific region, a cultural journey, or a personal adventure. By establishing a theme, you give your photo story a cohesive structure and a purposeful direction.
Plan and Research: Before you start your RV journey, plan and research the locations, landmarks, and experiences that align with your chosen theme. Explore the unique aspects of each destination, such as local traditions, historical significance, or natural wonders. This groundwork will help you identify key photographic opportunities and ensure that your images contribute to the narrative you want to convey.
Capture a Range of Shots: To create a compelling photo story, aim to capture a range of shots that collectively convey your chosen theme. Include wide-angle scenic shots that establish the sense of place and provide context. Capture medium shots that focus on specific details or subjects, such as people, wildlife, or cultural elements. Don’t forget to capture close-up shots that reveal textures, emotions, or intricate details.
Emphasize Details and Candid Moments: In addition to the grand vistas, pay attention to the smaller details and candid moments that add depth to your photo story. Capture the expressions of locals, the intricate craftsmanship of cultural artifacts, or the interactions between people and their environment. These images provide a more intimate and authentic perspective of your travel experiences.
Sequence Your Images: Once you have a collection of photographs, consider the order in which they will be presented to tell a cohesive story. Arrange your images in a way that creates a narrative flow. Start with a compelling opening shot that grabs the viewer’s attention and establishes the theme. Then, sequence your images to build a visual progression that engages the viewer from start to finish.
Pay Attention to Composition: Composition plays a crucial role in visual storytelling. Utilize composition techniques such as leading lines, rule of thirds, framing, and balancing elements to guide the viewer’s eye and reinforce the narrative. Consider how the arrangement of elements within the frame can enhance the story you’re telling. Experiment with different angles, perspectives, and focal lengths to create visually compelling compositions.
Use Captions and Descriptions: Accompany your images with captions or descriptions that provide context and add depth to your photo story. Share stories, anecdotes, or interesting facts that complement the visuals. Captions can help create a stronger connection between the viewer and the images, enhancing their understanding and appreciation of the travel experience.
Edit and Refine: After capturing your images and sequencing them, review and refine your photo story. Look for consistency in style, visual coherence, and narrative flow. Remove any images that don’t contribute to the story or disrupt the overall theme. Use post-processing techniques to enhance the images and ensure visual consistency.
Share and Engage: Once your travel photo story is complete, share it with others through various platforms such as social media, personal blogs, or online photography communities. Engage with your audience by inviting them to share their thoughts, experiences, or connections to the story. Encourage dialogue and foster a sense of connection through your visual storytelling.
By following these steps, you can create a compelling travel photo story that takes viewers on a captivating journey through your RV adventures. Remember, the key is to convey the essence of your experiences, evoke emotions, and share the beauty and significance of the places you visit through your photographs.
Mobile Photography Tips
Clean Your Lens: Before you start taking photos with your mobile phone, make sure to clean the lens. Mobile devices often accumulate fingerprints, smudges, or dust on the lens, which can affect the clarity and sharpness of your images. Use a microfiber cloth or lens cleaning solution to gently wipe the lens clean and ensure optimal image quality.
Composition and Framing: Apply basic composition principles to create visually pleasing images. Use the rule of thirds, leading lines, or symmetry to compose your shots effectively. Experiment with different angles and perspectives to find interesting viewpoints. Take your time to frame the scene and adjust the composition to capture compelling images.
Control Exposure and Focus: Most mobile camera apps allow you to tap on the screen to set the focus and exposure point. Utilize this feature to ensure your subject is in focus and properly exposed. Tap on the area you want to prioritize in the frame, and the camera will adjust the focus and exposure accordingly.
Utilize HDR and Exposure Compensation: High Dynamic Range (HDR) mode can help balance exposure in challenging lighting conditions. It captures multiple images at different exposures and blends them together to produce a well-exposed photo. Enable HDR when shooting scenes with a wide range of brightness, such as landscapes with bright skies and dark foregrounds. Additionally, some camera apps offer exposure compensation, allowing you to manually adjust the exposure to your preference.
Experiment with Burst Mode: Burst mode can be handy when photographing moving subjects or capturing fast-paced moments. By holding down the shutter button, your phone will capture a rapid series of photos. This increases the chances of getting the perfect shot, especially when there is action involved. Later, you can select the best image from the burst sequence.
Use the Gridlines: Enable the gridlines feature in your camera app to assist with composition. The gridlines divide the frame into thirds, helping you align your subjects and elements along the gridlines or at their intersections. This feature can greatly enhance the balance and visual appeal of your images.
Experiment with Different Apps: Explore third-party camera apps that offer advanced features and manual controls. These apps often provide more flexibility and creative control over your mobile photography. Experiment with apps that offer manual exposure, white balance, ISO, and focus controls to fine-tune your images to your liking.
Edit with Mobile Editing Apps: Take advantage of mobile editing apps to enhance your photos directly on your phone. Apps like Snapseed, Lightroom Mobile, or VSCO offer a wide range of editing tools to adjust exposure, contrast, colors, and more. You can crop, straighten, apply filters, or make selective adjustments to refine your images and make them more visually appealing.
Use Natural Light: Make the most of natural light when photographing with your mobile phone. Natural light often produces better results than artificial lighting. Shoot during the golden hours, shortly after sunrise or before sunset, when the light is soft and warm. Avoid harsh midday sunlight, as it can cause strong shadows and overexposure.
Experiment with Editing Styles: Mobile editing apps offer various filters and editing presets that can help you achieve different looks and styles. Experiment with different editing styles to create a cohesive aesthetic for your RV travel photos. Develop your own editing signature by adjusting settings like saturation, contrast, and color tones to reflect your personal vision.
By following these mobile photography tips, you can capture impressive images using your smartphone during your RV travels. Remember, the best camera is the one you have with you, and with the right techniques and editing tools, your mobile phone can produce stunning results.
Overcoming Challenges of RV Travel Photography
Limited Time at Each Location: One of the challenges of RV travel is the limited time you may have at each location. To make the most of your time, plan your itinerary in advance and prioritize the key photography spots. Conduct research to identify the best times to visit for optimal lighting conditions or when the attractions are less crowded. Be prepared to wake up early or stay late to capture the golden hours when the light is soft and appealing.
Unpredictable Weather Conditions: Weather can be unpredictable during RV travel, which can pose challenges for photography. Keep an eye on weather forecasts and be flexible with your plans. Embrace different weather conditions as they can add drama and uniqueness to your images. Overcast skies can create soft, diffused light that works well for certain subjects, while stormy skies can add mood and intensity. Use weather conditions to your advantage and adapt your shooting style accordingly.
Restricted Access to Certain Areas: Some RV travel destinations may have restricted access to protect the environment or wildlife. Respect the rules and regulations in place to preserve the locations you visit. Research in advance to understand any limitations and plan your photography accordingly. Look for alternative viewpoints or compositions outside of restricted areas that still allow you to capture the essence of the place.
Balancing Driving and Photography: Finding a balance between driving to your next destination and devoting time to photography can be challenging. Plan your route with photography opportunities in mind, including allocating sufficient time at each location. Be mindful of travel distances and set realistic expectations for the number of stops and photography sessions you can fit into your schedule. Remember, the journey itself can offer photographic opportunities, so embrace the moments on the road as well.
Dealing with Crowds: Popular RV travel destinations can often be crowded, especially during peak seasons. To overcome this challenge, try to visit popular locations during off-peak hours or consider alternative times of the year when crowds are less likely. Be patient and wait for moments when the crowds thin out, or find creative angles and compositions that minimize the presence of people. Additionally, explore lesser-known or off-the-beaten-path spots to discover unique photographic opportunities with fewer people around.
Storage and Backup: RV travel may involve being away from home for an extended period, which means you’ll be accumulating a large number of photographs. Ensure you have sufficient storage space for your camera gear and backup solutions for your images. Carry extra memory cards and portable hard drives to back up your files regularly. Utilize cloud storage or online backup services to safeguard your images in case of loss or damage to your equipment.
Embracing Imperfections: Not every photograph will turn out perfect, and that’s okay. Embrace the imperfections and learn from them. Use challenging lighting conditions or unexpected moments as opportunities to experiment and get creative. Sometimes, the most memorable and unique images come from embracing the imperfections and capturing the authentic essence of the moment.
Staying Inspired and Motivated: During long RV journeys, it’s essential to stay inspired and motivated as a photographer. Seek inspiration from other photographers, whether through books, online portfolios, or social media platforms. Connect with fellow RV travelers and photography communities to share experiences and ideas. Continuously challenge yourself to try new techniques, experiment with different subjects, and push your creative boundaries.
By recognizing and proactively addressing these challenges, you can overcome the obstacles that come with RV travel photography. Embrace the opportunities presented by each situation, adapt your plans, and maintain a positive mindset. Remember that the journey is just as important as the destination, and every experience contributes to your growth as a photographer.
Ethics and Responsible Photography
Respect for the Environment: As a photographer, it’s essential to prioritize the well-being and preservation of the environment. Respect the natural spaces you visit during your RV travels. Stay on designated trails to minimize your impact on delicate ecosystems. Avoid trampling on vegetation or disturbing wildlife habitats. Leave no trace by picking up your trash and respecting the local guidelines for waste disposal.
Wildlife and Animal Welfare: When photographing wildlife, it’s crucial to prioritize the welfare and comfort of the animals. Keep a safe distance to avoid causing stress or disturbance. Use telephoto lenses to capture close-up shots without encroaching on the animal’s personal space. Do not feed or bait wildlife, as this can disrupt their natural behavior and create dependency on human presence. Follow park regulations and respect any restricted areas to protect the animals and their habitats.
Cultural Sensitivity: Respect the cultures and traditions of the communities you encounter during your RV travels. Seek permission before photographing individuals or their cultural practices. Be aware of any local customs, sensitivities, or restrictions related to photography. Ask for consent and respect the privacy of people you photograph, especially in intimate or personal settings.
Consideration for Others: Be considerate of fellow travelers, visitors, and locals when taking photographs. Avoid obstructing walkways or viewpoints, especially in crowded areas. Be mindful of others’ experiences and ensure your photography does not interfere with their enjoyment. Respect private property and obtain permission when photographing on private land.
Representation and Stereotypes: Be conscious of how your photographs represent people, cultures, and communities. Avoid perpetuating stereotypes or misrepresenting individuals or cultural practices. Aim to capture diverse perspectives and showcase the richness and complexity of the places you visit. Celebrate diversity and promote inclusive storytelling through your photographs.
Consent and Privacy: Respect the privacy and consent of individuals you photograph. When photographing people, especially in intimate or vulnerable situations, seek their permission and respect their wishes if they decline. Communicate openly and honestly about the purpose of your photography and how the images will be used. Obtain signed model releases when necessary, particularly if you plan to use the photographs for commercial purposes.
Awareness of Local Laws and Regulations: Familiarize yourself with local laws and regulations related to photography in the areas you visit. Different countries, regions, or cultural sites may have specific rules regarding photography, including restrictions on certain subjects or areas. Adhere to these guidelines and be aware of any permits or licenses required for commercial photography.
Ethical Editing and Representation: Practice ethical editing techniques that maintain the integrity and authenticity of your photographs. Enhance your images while preserving the essence of the scene and avoiding excessive alterations that may distort reality. Be transparent about your editing processes when sharing your work to maintain trust and authenticity.
Giving Back and Conservation: Consider ways to give back to the communities and environments that you photograph. Support local conservation efforts, organizations, or initiatives that work towards preserving the natural and cultural heritage of the places you visit. Educate yourself and others about the importance of conservation and responsible tourism through your photography and storytelling.
By practicing ethics and responsible photography, you can contribute to the preservation and appreciation of the natural and cultural wonders you encounter during your RV travels. Be mindful of the impact your photography has on the environment, wildlife, and local communities, and strive to tell meaningful stories that inspire respect and promote responsible travel.
Frequently Asked Questions
RV travel photography is a captivating blend of exploration, adventure, and creative expression. As you embark on your journey, it’s natural to have questions about the best gear, techniques, and tips for capturing stunning images along the way. In this section, we address some of the frequently asked questions that arise when it comes to RV travel photography. From choosing the right camera to maximizing limited space, capturing landscapes, and documenting your RV lifestyle, we provide insights and practical advice to help you navigate the world of RV travel photography. Whether you’re a beginner or an experienced photographer, these frequently asked questions will equip you with the knowledge and guidance to elevate your photography skills and capture unforgettable moments during your RV travels.
What type of camera is best for RV travel photography?
The best camera for RV travel photography is one that suits your needs and preferences. While many photographers prefer DSLR or mirrorless cameras for their versatility and image quality, modern smartphone cameras can also produce impressive results. Choose a camera that is lightweight, easy to carry, and fits within your budget. Ultimately, the key is to use the camera that you are most comfortable with and that allows you to capture the images you envision.
What are some essential camera accessories for RV travel photography?
Some essential camera accessories for RV travel photography include:
- Tripod: A sturdy tripod is essential for capturing sharp images, especially in low light or for long-exposure shots.
- Extra Batteries and Memory Cards: Ensure you have spare batteries and memory cards to avoid running out of power or storage space during your travels.
- Lens Filters: Consider investing in filters such as polarizers or neutral density filters to enhance your images and control light.
- Lens Cleaning Kit: Keep your lenses clean and free from dust or smudges with a lens cleaning kit, including a microfiber cloth and lens cleaning solution.
- Remote Shutter Release: A remote shutter release allows you to trigger the camera without touching it, reducing the risk of camera shake during long exposures or self-portraits.
How can I make the most of limited space in an RV for my camera gear?
Space can be limited in an RV, so it’s important to be mindful of your camera gear. Consider compact and versatile equipment that doesn’t take up much space. Opt for multi-purpose lenses that cover a wide range of focal lengths, reducing the need to carry multiple lenses. Use camera bags or cases with efficient organization systems to maximize storage space. Prioritize the essentials and only bring gear that you will genuinely use during your travels.
What are some tips for photographing landscapes during RV travel?
When photographing landscapes during RV travel, consider the following tips:
- Scout Locations: Research and scout locations in advance to identify the best spots for landscape photography.
- Golden Hours: Make use of the soft, warm light during the golden hours (shortly after sunrise and before sunset) for more pleasing and dramatic landscapes.
- Use a Tripod: Use a tripod to capture sharp and well-composed landscape images, especially during long exposures or when using smaller apertures.
- Leading Lines: Incorporate leading lines, such as roads or trails, to guide the viewer’s eye into the scene and create depth.
- Utilize Foreground Elements: Include interesting foreground elements to add depth and create a sense of scale in your landscape compositions.
How can I capture compelling images of my RV lifestyle during my travels?
To capture compelling images of your RV lifestyle, consider the following tips:
- Include People: Incorporate yourself, your travel companions, or fellow RVers in your images to add a personal touch and create a sense of connection.
- Document the Details: Capture the unique aspects of RV life, such as cozy campfire gatherings, cooking meals, or enjoying the outdoor scenery from your RV.
- Show the Surroundings: Highlight the breathtaking landscapes, scenic campsites, and stunning natural features that you encounter during your travels.
- Embrace Candid Moments: Capture candid and spontaneous moments that showcase the joy, adventure, and camaraderie of RV living.
- Experiment with Perspectives: Try different angles and viewpoints to capture your RV lifestyle from unique perspectives, whether it’s from inside the RV, at ground level, or from above.
These are just a few common questions related to RV travel photography. Remember to always adapt your techniques and equipment to suit your specific needs and style. Enjoy your RV travels and capture the memorable moments along the way!
Final Thoughts
As you embark on your RV travel adventures, the world becomes your canvas, and the possibilities for stunning photography are endless. By applying the tips and techniques discussed throughout this article, you can elevate your RV travel photography and capture images that truly reflect the beauty and essence of your journey.
From planning your photography route and packing the essential gear to embracing natural light, capturing the essence of your surroundings, incorporating the RV lifestyle, and post-processing your images, each aspect of RV travel photography has been explored to help you create compelling visual narratives.
Remember to approach photography with an open mind, embrace the unexpected, and let your creativity flourish. RV travel photography is not just about capturing beautiful images but also about telling stories, preserving memories, and inspiring others to embark on their own adventures.
As you venture into the world of RV travel photography, always prioritize ethics and responsible practices. Respect the environment, wildlife, local cultures, and the privacy of individuals. By being considerate and responsible photographers, we can protect the places we visit and ensure the sustainability of our planet’s natural and cultural treasures.
So, pack your camera gear, fuel your wanderlust, and embark on your RV travel photography journey. Embrace the breathtaking landscapes, vibrant cultures, and unique experiences that await you. Use your lens to capture the beauty of the world, tell your own stories, and inspire others to explore the wonders of RV travel.
May your RV travels be filled with incredible moments, lifelong memories, and photographs that transport you back to those magical moments. Happy RV travel photography!